KB: Usage Guide
Last Updated
Contents:
- General Rules
- Action Words
- Font Styles
- Additional Notes, Warnings, Hints, Optional Steps
- Text Styles and Punctuation
- Images
- Headings
- Anchor Use
- Creating a link
- Updating new links
General Rules
- Any explanatory text regarding the article topic should be made in the introduction of the article or section, not within steps.
- Title format:
Application Version/Subject: Topic Title (e.g. Word 2013: Creating a Table of Contents, or Email: Recover Deleted Items) - Include snippets - Announcement first, category snippet second.
Action Words
Click – single action mouse commands. Buttons, links, etc. (e.g. Click the Start button.)
Select – use in menus: dropdowns, radio buttons, checkboxes (e.g. Select Other.)
Press – any keyboard command (e.g. Press [Enter] on the keyboard)
Type – use when indicating words that need to be entered (do not write "Enter...") (e.g. Type your username and password.)
Highlight – used for selecting a section of text
Drag and Drop – Separate “thing” from destination (e.g. Drag the Internet Explorer icon and drop it in the Recycle Bin.)
Font Styles
No Style
- Article text for clicking a button without text - even when hovered. Typically add an image of the button in this kind of step.
(e.g. "Click the arrow button")
Bold
- Article text for clicking a button including text (e.g. "Click Save").
- Article text for clicking a button that only displays text when hovered (e.g. "Click the Windows 7 Start button").
Italics
- Referencing an area: panes, menus, windows, sections, etc. (e.g. Scroll down the page to the Images section.)
Bold & Italics
- Any select items found within: dropdowns, radio buttons, checkboxes, tables. (e.g. Click the Start menu. Select Control Panel.)
Brackets
- Keyboard shortcuts (e.g. [Ctrl + Alt + Delete])
- Keyboard commands (e.g. Press [Enter] on the keyboard)
Additional Notes, Warnings, Hints, Optional Steps
- Additional notes, warnings, and hints should be listed beneath the step using a carriage return ([Shift + Enter]) with an additional carriage return after the note.
- Entire note, warning, hint sentence should be a italicized, with the title in all caps.
- Optional steps should include (Optional) at the beginning of the heading/step (e.g. (Optional) Next step here).
Example:
- Click Save.
NOTE: Failing to click save in this step will result in a loss of work.
- (Optional) Next step here.
Text Styles and Punctuation
- Capitalize the first letter in every step.
- Button text should be written in articles exactly as displayed in the application.
Images
- Include pictures of icons/buttons for icons/buttons without text adjacent to article text icon/button title.
(e.g. Click the Chrome Settings button <image>) - Pictures used to clarify a step should be added after the step using a carriage return with space (additional carriage return) after image to add a space.
- Pictures should have a line of blank below them, to separate them from text.
- Pictures used to illustrate multiple steps should appear after the steps.
- Most pictures should be 500 pixels wide or smaller. Exceptions include pictures that lose necessary information when resized.
- Images must be uploaded to the Knowledge Base files before being uploaded to articles.
Image Naming Convention
- Use only lower case letters, and omit spaces.
- Use the following format (multiple images per article):
category-topic1, category-topic2, etc. (e.g. word2013-pagenumbers1, word2013-pagenumbers2)
Headings
- Use headings to group relevant information, guide the reader, and break up large blocks of texts.
- Never use H1.
- Use H2 for section titles.
- Use H3 for section subtitles.
- Use H4 for topics sections (table of contents).
FAQs Article Formatting
- For an article that contains only FAQs and their answers, do not use headings.
- Include a topics section (table of contents) of all of the questions.
- Type all of the questions as regular sentences, with punctuation and sentence capitalization.
- Instead of turning the questions into headers, bold them. The answers should also be normal size, but not bolded.
- Use a carriage return between the questions and their answers, with an extra space between each question.
- If a regular article contains an FAQs section within it, follow the same directions, but format the questions and answers into a bulleted list.
Example:
What does FAQs stand for?
Frequently Asked Questions
Should FAQs be formatted as headings?
No.
Frequently Asked Questions
Should FAQs be formatted as headings?
No.
OR
- What does FAQs stand for?
Frequently Asked Questions - Should FAQs be formatted as headings?
No.
Anchor Use
The Anchor feature will be coming soon.
- As a general rule, include a contents section (table of contents) with links to anchors for each heading and FAQ in articles where you need to scroll down to see all of the headings. This article itself is an example.
- Do not make entire headings or FAQs an anchor; only place anchors at the very beginning. Otherwise, the title will look like a broken link.
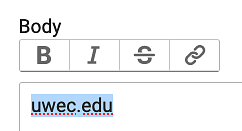
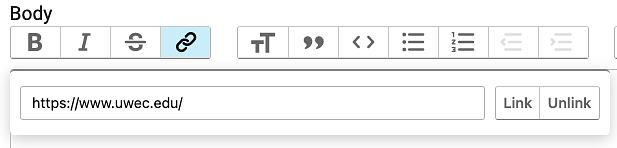
Creating a Link
- Click and drag over the text you wish to make a link.
Text highlighted - Select the link icon located at the top of the text box area.

Text highlighted with icons - Paste the link in the URL spot and click Link.

Hyperlink popup box
Updating a link
- Click and drag over the text you wish to make a link.
Text highlighted - Select the link icon located in the bottom right portion of the popup.
Text highlighted with icons - Delete the link and Paste the new one. Click Ok when done.
Hyperlink popup box