Virtual Lab (Lab Anywhere) makes University-supported software available to students, faculty, and staff on their personal computers and tablets. In fact, it can be accessed through any Windows PC, Mac, iPad, or Android tablet on a high speed Internet connection. The software has the same functionality as if it was installed on a personally-owned computer. While not all of the University-supported software is installed on the virtual lab, over 100 applications, including Microsoft Office, are available.
It is possible to connect to the virtual lab through your web browser.
Open a web browser, and navigate to https://virtual.uwec.edu. You will see the following screen:
To run the virtual lab through your web browser, click VMware Horizon HTML Access option on the right. NOTE: The Install VMware Horizon Client option on the left requires you to install the client on your computer before running the virtual lab. For instructions on this process, go to Virtual Lab for a Windows PC or Virtual Lab for macOS.
At this point, you may receive a message alerting you to the fact that the version of the browser you are using is not compatible with this service. The supported browsers will be listed for you, and you may need to upgrade your browser. If you don't wish to do this, select Click here to download the native client, and follow the directions to do this for Windows or Mac.
Enter your UWEC username and password.
Click Log In.
The next screen should prompt you for Duo Authentication. Please enter 1 for Duo push, 2 for Duo Phone call, 3 for Duo SMS passcodes.
Select the desired virtual machine. Students usually choose the General Access Lab Machine (which may be the only option available to you).
Once you are connected, you will automatically be logged in. Note that this will take several minutes. You now have a Windows 10 instance that acts exactly like you were in one of the campus computer labs. WARNING: Anything saved to the desktop or local computer is lost when you exit. Always save to your Onedrive. Your Onedrive can be accessed by going to https://onedrive.uwec.edu or by searching for Onedrive in the Windows Start Menu and logging into Onedrive.
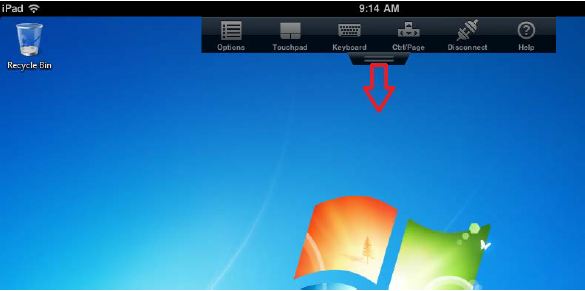
To disconnect from the virtual lab at any time and see your other options, click the arrow found at the top center of your screen to display the menu:
Installing Virtual Lab Client Software
Android
Requirements:
Device running Android 2.2 (or above) with Wi-Fi or 3G Data
Network connection with a speed of 756 Kbps or faster
Getting Started: Downloading the Android App
Open the Play Store, and search for VMware Horizon.
Tap the Install button next to the VMware Horizon for Android app.
Tap Accept & Download.
If necessary, enter your Google credentials. After the app downloads and installs, open the Horizon app from your Android's Application screen.
When the app opens, tap the Add Horizon Connection Server button to add the University's Horizon Connection Server.
In the text box labeled Server Name or Address, enter virtual.uwec.edu and tap Connect.
Enter your username and password, and verify that UWEC is listed for the domain. Then tap Connect.
The next screen should prompt you for Duo Authentication. Please enter 1 for Duo push, 2 for Duo Phone call, 3 for Duo SMS passcodes.
Tap the virtual machine you would like to use. (Students typically choose General Access Lab Machine.) You will be logged into a virtual machine. (This may take a moment.)
VMware Horizon Dashboard
The VMware Horizon for Android application includes a dashboard that you can access with your Android device's Menu button for more controls and settings. Tap the Menu buttonto expand the dashboard and use its settings. When not in use for a few seconds, the dashboard collapses to save screen space.
Tapping Touchpad or Keyboard on the dashboard will toggle a virtual touchpad or keyboard on and off. Selecting Ctrl/Page provides extra keyboard options, such as the Control (Ctrl), Page Up/Down and arrow keys. For more advanced keys, including the Function keys, there is a row of advanced keys in the upper area of the virtual keyboard. The touchpad and Ctrl/Page interface are able to be dragged across the screen to allow for extra space. The Options menu allows adjustment of the virtual touchpad's sensitivity and tool tips settings.
Pressing the Help option brings up a dialog window explaining how basic gestures work in the application. Here is a brief summary of the gestures you can use:
Click - Tap with one finger to make a regular left click.
Secondary click - Tap with two fingers to make a right click.
Drag - To drag, hold one finger down for about a second, until a small pulse appears, and then move your finger in the direction you want the mouse to drag.
Keyboard - Instead of toggling the keyboard from the dashboard as explained above, you can tap with three fingers where you want to type, and the virtual keyboard will appear.
Accurate dragging - Hold one finger, wait for the magnifying glass and position the cursor. Release, and then drag the hold cursor.
Scroll - To scroll, drag two fingers in the direction you would like to scroll.
Rotate - Rotating your Android device allows the environment to be used vertically or horizontally and the device will automatically configure the screen resolution accordingly.
In the virtual environment, drives are accessible in the same way as a physical campus lab machine. Press Start » Computer to access your campus drives, and Start » Documents to access files in your H: drive.
You now have a Windows 10 instance that acts exactly like you were in one of our labs.
WARNING: Anything saved to the desktop or local computer is lost when you exit. Always save to your Onedrive. Your Onedrive can be accessed by going to https://onedrive.uwec.edu or by searching for Onedrive in the Windows Start Menu and logging into Onedrive.
iPad
Requirements:
Apple iPad or iPad 2, Wi-Fi or 3g
Network connection with a speed of 756 Kbps or faster
Getting Started: Downloading the iPad App
Open the App Store app, and search for VMware Horizon.
Tap the Free button next to the VMware Horizon View for iPad app.
Tap Install App.
Enter your Apple ID credentials.
After the app downloads and installs properly, open the VMware Horizon app from your iPad's home screen.
When the app opens, tap the plus sign in the upper right corner of the app to add the university Horizon Connection Server. (You may also instead tap Add View Connection Server if that appears in the center area of the screen.)
Type virtual.uwec.edu
Tap Connect.
Tap the virtual machine you would like to use. (Students typically choose General Access Lab Machine).
Enter your username and password, and verify that UWEC is listed for the domain.
The next screen should prompt you for Duo Authentication. Please enter 1 for Duo push, 2 for Duo Phone call, 3 for Duo SMS passcodes.
Turn Remember This Password to ON if you would like the app to remember your credentials in the future.
Tap Done, and you will be logged into a virtual machine.
VMware Horizon Dashboard
The VMware Horizon for iPad application includes a dashboard at the top of the screen for more controls and settings. Tap its lower edge to expand the dashboard and use its settings. When not in use for a few seconds, the dashboard collapses up for screen space.
Tapping Touchpad or Keyboard on the dashboard will toggle a virtual touchpad or keyboard on and off. Selecting Ctrl/Page provides extra keyboard options, such as the Control (Ctrl), Page Up/Down and arrow keys. For more advanced keys, including the Function keys, there is a row of advanced keys in the upper area of the virtual keyboard. The touchpad and Ctrl/Page interface are able to be dragged across the screen to allow for extra space. The Options menu allows adjustment of the virtual touchpad's sensitivity and tool tips settings.
Pressing the Help option brings up a dialog window explaining how basic gestures work in the application. Here is a brief summary of the gestures you can use:
Click - Tap with one finger to make a regular left click.
Secondary click - Tap with two fingers to make a right click.
Drag - To drag, hold one finger down for about a second, until a small pulse appears, and then move your finger in the direction you want the mouse to drag.
Keyboard - Instead of toggling the keyboard from the dashboard as explained above, you can tap with three fingers where you want to type, and the virtual keyboard will appear.
Accurate dragging - Hold one finger, wait for the magnifying glass and position the cursor. Release, and then drag the hold cursor.
Scroll - To scroll, drag two fingers in the direction you would like to scroll.
Rotate - Rotating the iPad allows the environment to be used vertically or horizontally and will automatically configure the screen resolution accordingly.
In the virtual environment, drives are accessible in the same way as a physical campus lab machine. Press Start » Computer to access your campus drives, and Start » Documents to access files in your H: drive.
You now have a Windows 10 instance that acts exactly like you were in one of our labs.
WARNING: Anything saved to the desktop or local computer is lost when you exit. Always save to your Onedrive. Your Onedrive can be accessed by going to https://onedrive.uwec.edu or by searching for Onedrive in the Windows Start Menu and logging into Onedrive.
macOS
Getting Started: Installing the Local Mac Client
Open a web browser, and navigate to https://virtual.uwec.edu. You will see the following screen:
To install the local client on your computer, select the Install VMware Horizon View Client option.
You will be brought to a page with a list of possible VMware Horizon Client options to download. Scroll down in the list until you see VMware Horizon Client for Mac.
Next to this option, click the Go to Downloads button. You will be brought to a page similar to the one below.
Click Download near the bottom right of the screen.
A window will pop up, asking you if you wish to save the file. Click Save File.
The Downloads window will open, showing VMware Horizon Client in the list. Double-click this option in the list.
A License Agreement window will appear, asking if you agree with the terms and conditions of VMware. Click Agree.
In the window that opens, click and drag the VMware Horizon Client to the Applications folder next to it. This will install the Client.
VMware Horizon Client is now installed.
Running the Virtual Lab Client
On the top right of your computer screen, click the magnifying glass and start searching for VMware Horizon Client. Click it when it appears in the list.
A download warning may appear; click Open.
In the window that appears, click Add Server.
In the Hostname text box, type virtual.uwec.edu
You will then be asked to login with your UWEC username and password.
The next screen should prompt you for Duo Authentication. Please enter 1 for Duo push, 2 for Duo Phone call, 3 for Duo SMS passcodes.
In the window that appears, double click the General Access Lab Machine icon.
After a moment, the virtual machine will become available for your use. Note that it takes some time for it to login.
You now have a Windows instance that acts exactly like you were in one of our labs. Note that it does not contain all the software available in a lab, but provides quite a bit of the essential software.
WARNING: Anything saved to the desktop or local computer is lost when you exit. Always save to your Onedrive. Your Onedrive can be accessed by going to https://onedrive.uwec.edu or by searching for Onedrive in the Windows Start Menu and logging into Onedrive.
To install the local client on your computer, select the Install VMware Horizon View Client option.
You will be brought to the page below, select the dropdown. Click on version 5.0 and then product 5.4.4
Near the top of the list, you will see the VMware Horizon Clients for both 32-bit Windows and 64-bit Windows. Next to the appropriate option, click Go to Downloads.
A screen similar to the one below will appear.
Click Download Now at the bottom right of the screen.
Click Run at the bottom of the screen.
A window will appear, asking if you want to allow the following program (VMware) to make changes to your computer. Click Yes.
Follow the installer steps to install the View Client. Click Next to advance through the installation. You will also need to accept the license agreement to continue.
NOTES: When you reach the License Agreement screen, you will have to select I accept the terms in the license agreement in order to continue. When you reach the Custom Setup window, you can leave the settings unchanged and click Next.
When you reach the Default View Connection Server window, type virtual.uwec.edu in the text box, and click Next.
Choose your preferred set-up for the Enhanced Single Sign On default behavior and the Shortcuts to be installed, and click Next.
VMware Horizon is now ready to be installed. Click Install. The process will only take a minute or two.
A dialog box will appear, asking you if you wish to restart your computer now or later. This must be done at some point in order to complete the installation. To restart your computer now, click Yes. To do it later, click No.
Running the Virtual Lab Client
Access the virtual lab by using an installed shortcut or going to virtual.uwec.edu in your browser.
If using a shortcut, make sure the Connection Server text box reads virtual.uwec.edu
Click Connect.
In the box that appears, type your UW-Eau Claire username and password.
Click Login.
The next screen should prompt you for Duo Authentication. Please enter 1 for Duo push, 2 for Duo Phone call, 3 for Duo SMS passcodes.
Select which virtual machine you wish to use, and click Connect.
NOTE: Students usually choose General Access Lab Computer.
Once you are connected, you will automatically be logged in. It is normal for this to take several minutes. You now have a Windows 10 instance that acts exactly like you were in one of our labs.
WARNING: Anything saved to the desktop or local computer is lost when you exit. Always save to your Onedrive. Your Onedrive can be accessed by going to https://onedrive.uwec.edu or by searching for Onedrive in the Windows Start Menu and logging into Onedrive.
Frequently Asked Questions
Is Microsoft Office available on the virtual lab? Yes! Microsoft Word, Excel, PowerPoint, and all of the other applications in the Office suite are available to use.
Is Creative Cloud (Dreamweaver, Illustrator, InDesign, Photoshop, etc.) available on the virtual lab? No. The software license for the Creative Cloud makes it infeasible for this software to be installed on the virtual lab. LTS will continue to explore options for increasing the availability of Creative Cloud applications.
VPN is a related technology; will this interfere with the virtual lab? VPN will not interfere with the virtual lab. In fact, one could be running both simultaneously—but it isn't too ideal and also allows for more connections.
What should I do if I have a problem with the virtual lab? Please contact the LTS Help Desk and let them know about the problem. The Help Desk is located in Old Library 1106. You can also contact them by phone at 715-836-5711 or by e-mail at helpdesk@uwec.edu.